
This is a guide on how you install cradle-eCommerce on an 0xide computer.
Oxide computer company delivers “on-prem that feels like the public cloud”.
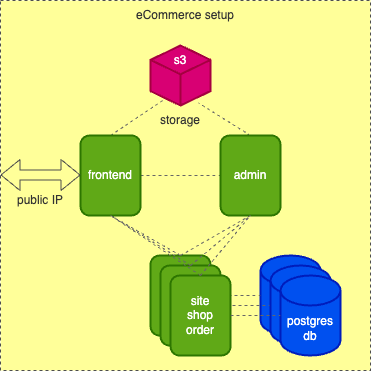
We are not going full k8s here but instead focus on a bare-metal installation with a separate postgres and a shared storage server (s3). With this setup we can fairly easily split out the frontend, admin and backend services into multiple instances to scale up the system when needed.
Overview of the installation on three instances, red, green and blue.
Oxide configuration
Oxide has a built in firewall on each VPC, we recommend that you limit ssh access to your own ip address and open up for inbound traffic on tcp port 80 and 443.
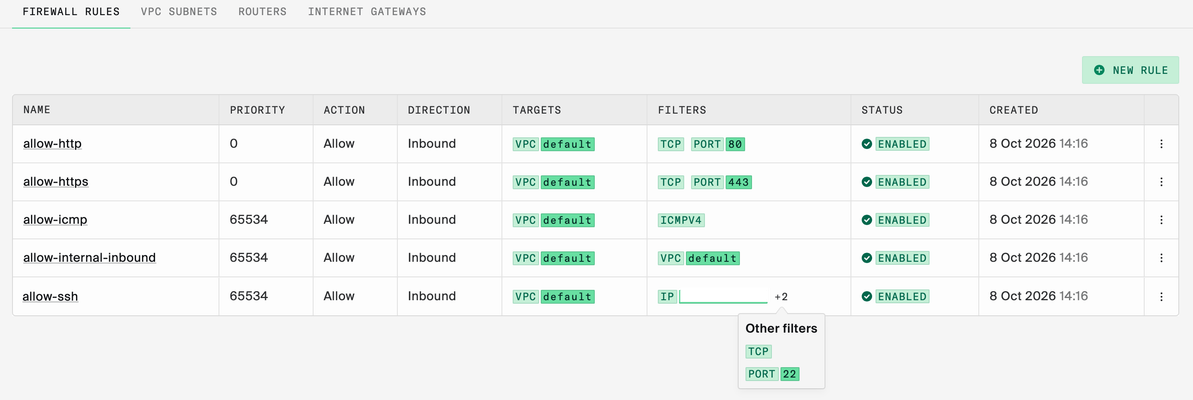
When creating rules you must acknowledge each setting with a click of a button before deploying the rule set. Read the overview table after each update, make sure the
targetsandfiltersare set.
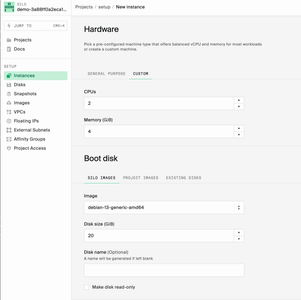
In Oxide admin we’ve uploaded a debian 13 trixie distribution as that is what we wanted to use.
For that you need to use a raw cloud image suited for installations on bare metal.
After you’ve promoted the image you can create three new instances, only one of the instances needs a public ip address.
Postgres server
Connect to the postgres instance using the public facing frontend server as a jumphost.
ssh -J debian@<public ip> debian@<your postgres server private ip>
For that to work you need to allow TCP forwarding on your jump host in /etc/ssh/sshd_config.
After you have logged in to the postgres server update system packages and setup the postgres database.
sudo apt update && apt upgrade -y
sudo apt install -y postgresql-common
# run the postgres setup script, it creates a 'postgres' user
sudo /usr/share/postgresql-common/pgdg/apt.postgresql.org.sh
# install postgres18 server
sudo apt install postgresql-18
# verify that the service has started
sudo systemctl status postgresql
edit postgresql.conf
vi /etc/postgresql/18/main/postgresql.conf
change listen_address to *
listen_addresses = '*' # what IP address(es) to listen on;
Restart postgres and list the bound listeners
sudo lsof -i
postgres  8481        postgres  6u  IPv4  21453      0t0  TCP *:postgresql (LISTEN)
postgres  8481        postgres  7u  IPv6  21454      0t0  TCP *:postgresql (LISTEN)
Switch to the postgres user and launch the psql client
sudo su - postgres
psql
We are going to utilise the same postgres instance for the whole setup.
create a database user and create the databases we need.
create user cradle with password 'secret';
create database site with owner cradle;
create database shop with owner cradle;
create database order with owner cradle;
\q
Configure remote access
vi /etc/postgresql/18/main/pg_hba.conf
Allow postgres access from inside the VPC according to your VPC network setup.
host all all 172.30.0.0/24 scram-sha-256
Restart the postgresql server
systemctl restart postgresql
Now we should be able to login to the postgres database from within the VPC network.
Install storage server
Connect to the storage instance using the public facing frontend server as a jumphost.
ssh -J debian@<public ip> debian@<your storage server private ip>
Install minio s3 object storage
fetch the latest minio realase.
mkdir src && cd src
wget https://github.com/minio/minio/archive/refs/tags/RELEASE.2025-10-15T17-29-55Z.tar.gz
tar zxvf RELEASE.2025-10-15T17-29-55Z.tar.gz
We are going to build the minio server from source so we need to install go.
sudo apt update && apt install golang
Build minio and install it locally
cd minio-RELEASE.2025-10-15T17-29-55Z
go build .
# install the compiled binary
sudo cp ./minio /usr/local/bin/
# test run the binary
minio -v
Create a minio user and the directories minio needs
# create a minio user
sudo useradd -r minio -s /sbin/nologin
# create config directory
sudo mkdir /etc/minio
# create storage directory
sudo mkdir /storage
sudo chown minio:minio /storage
Create a minio config file sudo vi /etc/minio/minio.conf
MINIO_VOLUMES="/storage"
MINIO_ROOT_USER=cradle
MINIO_ROOT_PASSWORD=your-minio-secret
Create minio systemd service sudo vi /etc/systemd/system/minio.service
[Unit]
Description=MinIO
After=network.target

[Service]
Type=simple
User=minio
Group=minio
EnvironmentFile=/etc/minio/minio.conf
ExecStart=/usr/local/bin/minio server $MINIO_OPTS $MINIO_VOLUMES
Restart=always
RestartSec=5
LimitNOFILE=65536

[Install]
WantedBy=multi-user.target
Start the service
sudo systemctl daemon-reload
sudo systemctl enable --now minio.service
Validate that it is up and running
sudo systemctl status minio
● minio.service - MinIO
     Loaded: loaded (/etc/systemd/system/minio.service; enabled; preset: enabled)
     Active: active (running) since Wed 2026-10-07 07:44:09 UTC; 9s ago
 Invocation: 444beb6b08f14a9ba639be9f9f05b2f9
   Main PID: 15091 (minio)
      Tasks: 7 (limit: 4632)
     Memory: 77M (peak: 77.4M)
        CPU: 580ms
     CGroup: /system.slice/minio.service
             └─15091 /usr/local/bin/minio server /storage

Oct 07 07:49:21 minio-s3 systemd[1]: Started minio.service - MinIO.
Oct 07 07:49:22 minio-s3 minio[15187]: MinIO Object Storage Server
Oct 07 07:49:22 minio-s3 minio[15187]: Copyright: 2015-2026 MinIO, Inc.
Oct 07 07:49:22 minio-s3 minio[15187]: License: GNU AGPLv3 - https://www.gnu.org/licenses/agpl-3.0.html
Oct 07 07:49:22 minio-s3 minio[15187]: Version: DEVELOPMENT.GOGET (go1.24.8 linux/amd64)
Oct 07 07:49:22 minio-s3 minio[15187]: API: http://172.30.0.7:9000  http://127.0.0.1:9000
Oct 07 07:49:22 minio-s3 minio[15187]: WebUI: http://172.30.0.7:42595 http://127.0.0.1:42595
Oct 07 07:49:22 minio-s3 minio[15187]: Docs: https://docs.min.io
NOTE the API and WebUI endpoint url:s
Since we only need to use the webui for setting up some buckets we use ssh port forwarding to access the WebUI.
# on your pc run this to setup local port forwarding
ssh -i your-oxide.key -N -L :42595:127.0.0.1:42595 debian@<your minio server ip>
Then open a browser and go to http://127.0.0.1:42595, login using your mini root credentials.
Create the following buckets media, theme, cache, certs.
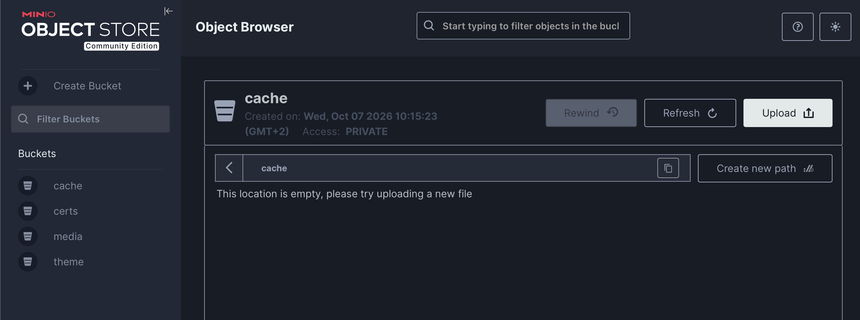
We have now finished setting up the s3 storage server that cradle-ecommerce can use.
Install ecommerce
This installs cradle-ecommerce on a single server instance using an external postgres database and a minio storage server.
You can follow our rootless podman installation guide we’ll change the quadlet configuration and use podman secret for configuring access to the db and storage server.
Save your credentials for registry.cradlecms.com/cradle-ecommerce in the auth.json at /home/cradle/.config/containers/auth.json
cradle-ecommerce quadlet
Login as the cradle user we’ve setup according to the guide linked above.
Create a cradle-ecommerce.quadlets file.
# FileName=cradle-ecommerce
[Unit]
Description=Cradle eCommerce

[Container]
Image=ecommerce-latest.image
ContainerName=cradle-ecommerce
Environment=DOMAIN_NAME=your.domain.name
PublishPort=443:4040
PublishPort=80:8080
AutoUpdate=registry
Secret=settings   # <- use secret settings

[Service]
Restart=always
RestartSec=10

[Install]
WantedBy=default.target
---
# FileName=ecommerce-latest
[Image]
Image=registry.cradlecms.com/cradle-ecommerce:latest
AuthFile=/home/cradle/.config/containers/auth.json
remember to change
DOMAIN_NAMEaccording to your own domain.
Create configuration for the database and storage in a settings.conf file.
[site.database]
dsn = "postgres://cradle:secret@172.30.0.5:5432/site"
migrate = true
[shop.database]
dsn = "postgres://cradle:secret@172.30.0.5:5432/shop"
migrate = true
[order.database]
dsn = "postgres://cradle:secret@172.30.0.5:5432/order"
migrate = true
[frontend.storage.s3]
AccessKey = "cradle"
SecretKey = "your-minio-secret"
Endpoint = "http://172.30.0.7:9000"
[admin.storage.s3]
AccessKey = "cradle"
SecretKey = "your-minio-secret"
Endpoint = "http://172.30.0.7:9000"
change the ip address
172.30.0.5to the ip or hostname of your postgres instance and the storageEndpointaccording to your minio API url.
Create the secret settings configuration.
podman secret create settings settings.conf --replace
Install the quadlet and start the cradle-ecommerce service
podman quadlet install -r ~/.config/cradle-ecommerce.quadlets
systemctl --user daemon-reload
# verify that cradle-ecommerce.service has been generated
systemctl --user cat cradle-ecommerce
# start the container
systemctl --user start cradle-ecommerce
# check the service status
systemctl --user status cradle-ecommerce
# start the auto update timer
systemctl --user enable --now podman-auto-update.timer
check with journalctl for any startup issues or errors
journalctl --user -u cradle-ecommerce
You should now be able access the installation through the configured domain name. The first request takes a couple of seconds while it negotiates a letsencrypt certificate. After that you can login to the cradle admin and start building your ecommerce site.

To further improve on this installation you should create a golden image to use on your instances and do a proper security audit, preferably by a third party. You can also split apart the frontend, admin, site, shop, and order services into their own instances. Having separate postgres servers for each of the backend services is recommended and easy to setup. If you need a distributed setup utilising anycast for regional load balancing (bgp, shortest path) you should use cockroachdb and an s3 cluster for storage.