
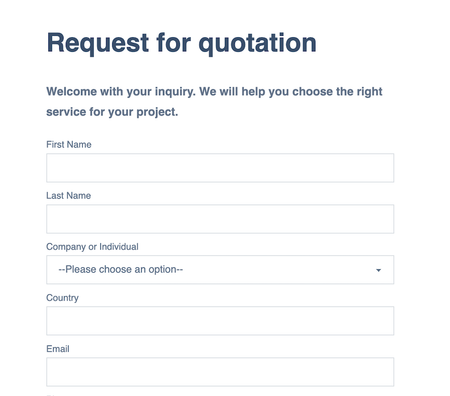
The built-in form builder enables the creation and management of forms, including contact forms and newsletter sign-ups.
All form submissions are validated server-side before being saved in the database. The generated forms can be added with optional HTML-code generation and with multiple forms on the same page.
- Secure data
The form submissions are stored on your server and make it easy to adhere to GDPR and other privacy laws. - Server-side data validation
Form submissions are validated before being saved in the database to prevent attacks, errors, and maintain data integrity. - Unlimited forms
This is a self-hosted solution: no limit on the amount of forms and form submissions. - Email notifications
Set up email notification when receiving a form submission. - Auto HTML generation
Optional HTML-code generation for easy setup of forms. - Multiple forms on pages
Multiple forms, such as a contact form as well as a newsletter signup, can be setup on the same page. - JS free
Forms work without JS. - Code freedom
Customize form HTML and CSS freely. - Connect to other services
Send form submissions to other services with webhooks. - Translations
All form fields and messages can be translated in Language > Translations (found under form context).
The forms can be used in JS-free sites as they do not require JS to function.
Form entries
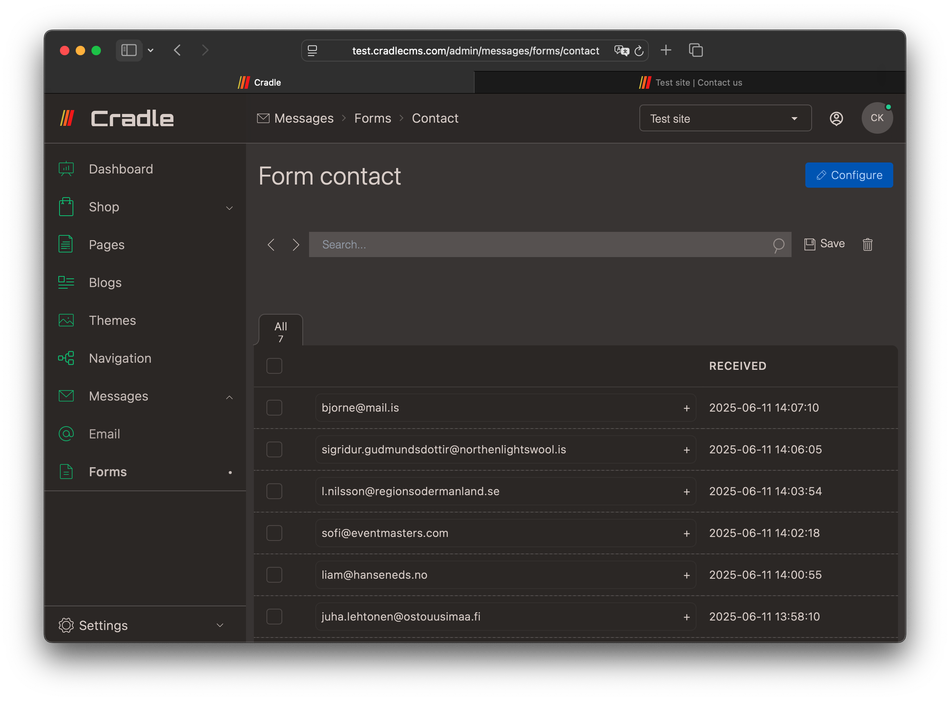
Form submissions are validated server-side before being saved.
Create form
- Navigate to
Forms, found underMessagesin the left-side menu. - Press
Create formand give a handle for the form. The handle is used as the form name and identifier when including on the site. - Choose form action
- Add fields and save
- Add to website through theme or adding form tag,
{ % form 'handle' %}{% endform %}
Form actions
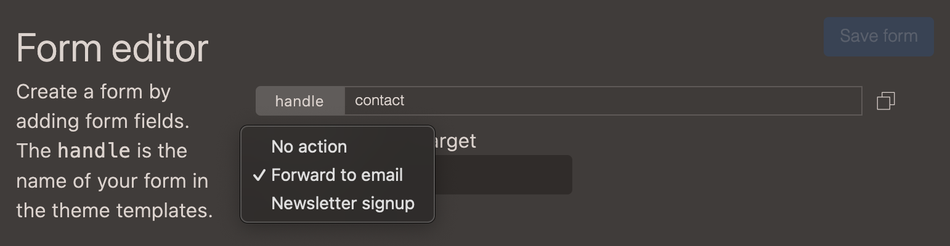
Three values are possible: No action, Forward to email, and Newletter signup.
| Action | Description |
|---|---|
| No action | The form entries are saved but no further actions are taken. |
| Forward to email | A copy of the form entry is also sent to the email specified in the field. |
| Newsletter signup | A customer is created in the system. |
Newsletter signup form
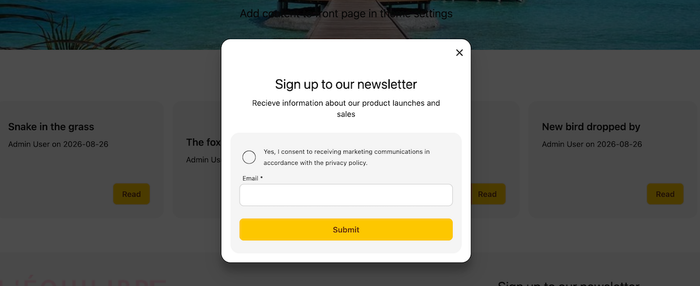
Steps in video
- Create a new form with the handle “newsletter”
- Add fields
- Save
The form can now be used on the website by including form-tag, {% form 'newsletter' %}{% endform %}, html code or in theme settings.
| Required | Name | Type | Value | Attributes | Match |
|---|---|---|---|---|---|
| Yes | Policy | checkbox | Yes, I consent to receiving marketing communications in accordance with the privacy policy. | ||
| Yes | |||||
| - | Submit | submit |
The marketing consent checkbox is mandatory within EU.
Contact form example
Steps in video
- Create a new form with the handle “contact”
- Add fields
- Save
| Required | Name | Type | Value | Attributes | Match |
|---|---|---|---|---|---|
| Yes | name | text | |||
| Yes | |||||
| - | subject | text | |||
| Yes | message | textarea | rows=6 placeholder=“Brief description of why you are contacting us…” | ||
| l | legal | paragraph | <small>Your personal information will be stored and used to respond to your inquiry, more information in our <a href="/privacy">privacy policy</a>.</small> |
||
| Yes | send | submit | send | class=“btn” |
The legal notice in the form is mandatory within EU, but for a contact form there is no need for a checkbox as in the case of a newsletter sign up.
Set up form fields
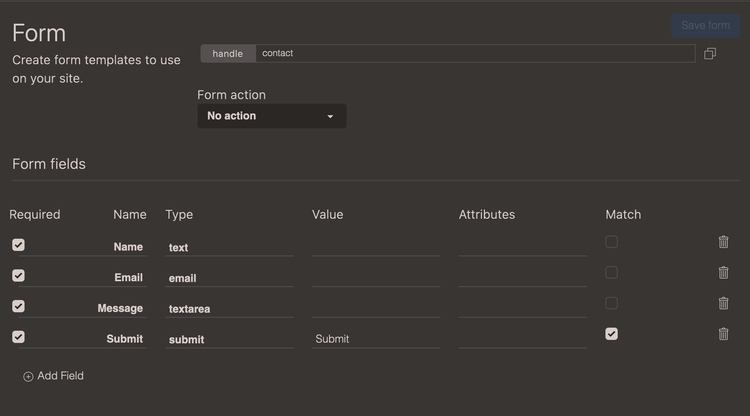
Fields are added in admin with a no-code builder. Forms are added and modified under Messages; also form submissions can be found here.
Form fields consist of Name, Type, Required, Match, Attributes, and Value. Each input field that the form will consist of needs to be specified in the admin, this is part of the form validation.
| Option | Description |
|---|---|
| Required | Form submissions are only accepted if containing this field. required will be added into the form field. HTML code should reflect this with the required attribute for the best UX experience. |
| Name | The name of the form field, used in the label and as HTML attribute name="email" for the input field. |
| Type | Type of HTML input field for example type="email". |
| Value | Sets a value on the input field. |
| Attributes | Adds input attributes for the generated HTML code. |
| Match | The given value has to match in the form submission, this can be used to create a validation to detect human users. |
Attributes
Attributes are specified as they are written in the HTML field with a space in-between. For example, for a text-field it is common to specify a placeholder placeholder="My name", or minimum and maximum values such as the starting date min="2025-10-07".
| Attribute name | Description | Example |
|---|---|---|
| disabled | Indicates an disabled field | disabled |
| class | Adds a CSS class to the element | class="btn" |
Mdn docs provides more information on how attributes are used in input fields.
Field types
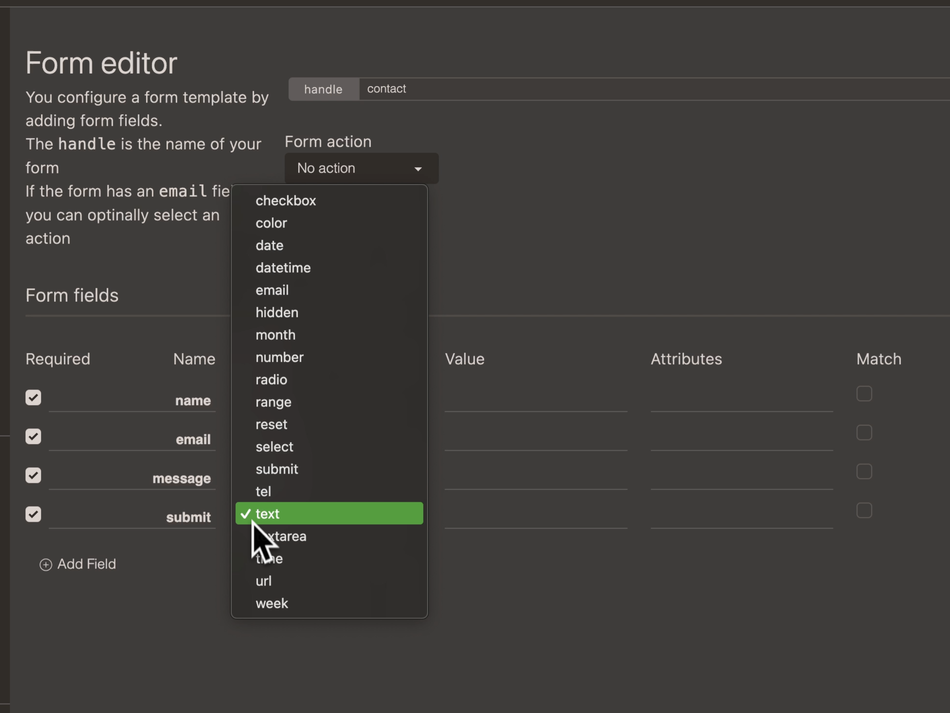
There is support for input types text, number, email, tel, url, color, date, datetime, month, week, time, range, hidden, reset and submit, as well as textarea and select.
All browsers will display the types in slightly different ways, and it is possible to add in your own styling with CSS to override the default browser styles - Webdev guide for forms.
| Name | Description |
|---|---|
| Checkbox | A square box that can be ticked. |
| Color | Displays a color picker. |
| Date | For specifying dates. |
| Datetime | For specifying date in combination with time. |
| Similar to a text input field but used for email-address insertions. | |
| Hidden | A way to add in meta data for the form entry. |
| Month | For specifying a month. |
| Number | Allows the user to specify a number. |
| Paragraph | A free text paragraph. |
| Radio | A radio button, usually added in a groups |
| Range | Choosing a value from a range. |
| Reset | A reset button for the form. |
| Select | Creates a select box. |
| Submit | A submit button for the form. |
| Time | For specifying a time. |
| Tel or phone | An input field for phone numbers. |
| Text | Is used for a single line of text, usually a name. |
| Textarea | Most commonly used to write a message. |
| URL | Input field for website addresses. |
| Week | For specifying a week. |
| Label | Label tag that can be used for input groups. |
More information about input types
<input>: The HTML Input element
Checkbox
Use checkboxes for consent acceptance or options.
| Field | Description |
|---|---|
| Required checkbox | The required checkbox is used to mark a checkbox which is required to be ticked. |
| Name field | The value is used on the input element name="policy". |
| Type | Set to Checkbox. |
| Value | The value in the field witll be shown inside the label as the title. |
| Attributes | Additional attributes, such as class="large" can be added in this field. |
| Match | N/A |
| Required | Name | Type | Value | Attributes | Match |
|---|---|---|---|---|---|
| Yes | Policy | Checkbox | I consent to having this website store my submitted information so they can respond to my inquiry. See our privacy policy to learn more about how we protect and manage your submitted data. | - | - |
<label>
	<input type="checkbox" value="I consent to having this website store my submitted information so they can respond to my inquiry. See our privacy policy to learn more about how we protect and manage your submitted data." name="policy" required="">
	I consent to having this website store my submitted information so they can respond to my inquiry. See our privacy policy to learn more about how we protect and manage your submitted data.
</label>
Colorpicker
The color field is used for adding a colorpicker in a form. When adding the field only a name is needed.
| Required | Name | Type | Value | Attributes | Match |
|---|---|---|---|---|---|
| - | Colorpicker | Color | - | - | - |
<label for="Colorpicker">Colorpicker</label>
<input type="color" name="Colorpicker">
Date and times
Using the specific types for dates and times will enable the browser to open up dedicated pickers for date and time.
Date
| Attributes | Description | Example |
|---|---|---|
| Value | Specify a preselected value. | value="2025-10-12" |
| Min | Start date from where dates can be selected | min="2025-10-07" |
| Max | Last date from where dates can be selected | max="2025-10-25" |
Datetime
Note that the type in HTML is
datetime-local
| Attributes | Description | Example |
|---|---|---|
| Value | Specify a preselected value. | value="2025-06-12T19:30" |
| Min | Start date from where dates can be selected | min="2025-06-07T00:00" |
| Max | Last date from where dates can be selected | max="2025-07-07T00:00" |
Month
Use the month type with caution, only partially supported - Can I Use?
Week
Use the week type with caution, only partially supported - Can I Use?
Time
| Attributes | Description | Example |
|---|---|---|
| Value | Specifies a preselected value. | value="13:30" |
| Min | Earliest time | min="08:30" |
| Max | Latest time | max="19:00" |
Usually the email input field is required.
| Required | Name | Type | Value | Attributes | Match |
|---|---|---|---|---|---|
| Yes | - | - | - |
<label for="Email">Email</label>
<input type="email" name="Email" required="">
Hidden
A hidden field is not shown to users but can be used to hold information that needs to be submitted with the form.
| Required | Name | Type | Value | Attributes | Match |
|---|---|---|---|---|---|
| - | Hidden | Hidden | - | - | - |
<input type="hidden" name="Hidden" value="">
Label
The type label makes it possible to add another label to a form field. Text is inserted int the value field and the name should be same as for the form fields.
| Required | Name | Type | Value | Attributes | Match |
|---|---|---|---|---|---|
| - | myInput | Label | Title of the label | - | - |
<label for="myInput">Title of the label</label>
If using multiple labels for the same input field it is a good idea to use aria property
aria-labelledby, both aria properties and html ids can be added in theAttributesfield in the forms builder. Reference: Mozilla developer resource
Number
Number input can be used to collect a number.
It is possible to get stepped values between a minimum and maximum amount by adding the attribute step.
| Required | Name | Type | Value | Attributes | Match |
|---|---|---|---|---|---|
| - | Amount | Number | - | min=“100” max=“900” step=“10” | - |
<label for="Amount">Amount</label>
<input type="number" name="Amount" min="100" max="900" step="10" >
Paragraph
The field type paragraph is used for adding a text field and the content will be added inside <p> tags.
| Required | Name | Type | Value | Attributes | Match |
|---|---|---|---|---|---|
| - | Text | Paragraph | <small>Your personal data will be used to support your experience throughout this website, to manage access to your account, and for other purposes described in our privacy policy.</small> |
- | - |
<p><small>Your personal data will be used to support your experience throughout this website, to manage access to your account, and for other purposes described in our privacy policy.</small></p>
Radio buttons
Radio buttons are used for choosing an option out of several, for example to choose preferred contact method or colors.
In admin each radio button is setup as a separate field and one additional one for the label, the same name links them together. checked can be added as an attribute and will preselect one of the options.
| Required | Name | Type | Value | Attributes | Match |
|---|---|---|---|---|---|
| - | color1 | Label | - | - | - |
| - | color1 | Radio | Blue | - | - |
| - | color1 | Radio | Red | - | - |
| - | color1 | Radio | Green | - | - |
More about radio buttons on mdn
<label for="color1">Pick color</label>
<label><input type="radio" value="blue" name="color1" required="">Blue</label>
<label><input type="radio" value="red" name="color1" required="">Red</label>
<label><input type="radio" value="green" name="color1" required="">Green</label>
Range
A range is used to pick a value between a min and a max value.
In admin a range is setup with a single field, this created both a label and and the input element for the range picker. Typical attributes to add is min, max and step.
| Required | Name | Type | Value | Attributes | Match |
|---|---|---|---|---|---|
| - | Range | Range | - | min=“0” max=“100” step=“10” | - |
<label for="Range">Range</label>
<input type="range" name="Range" min="0" max="100" step="10">
More on how to work with the range element on mdn.
Reset
The reset type adds a reset button which clears all inputs.
| Required | Name | Type | Value | Attributes | Match |
|---|---|---|---|---|---|
| - | Reset | Reset | Reset | - | - |
<input type="reset" name="Reset" value="Reset">
Select
A select-box will show a drop-down with options to choose from when pressed. The options are given under Value in a list separated with commas.
| Required | Name | Type | Value | Attributes | Match |
|---|---|---|---|---|---|
| - | animals | Select | Cat, Dog, Rabbit | - | - |
<label for="Select">Select</label>
<select name="Select">
  <option value="Cat">Cat</option>
  <option value="Dog">Dog</option>
  <option value="Rabbit">Rabbit</option>
</select>
More options
- Options values can have separate title when using : on value:title
- A hyphen value
-inserts a horizontal ruler<hr>in the select options dropdown list.
| Required | Name | Type | Value | Attributes | Match |
|---|---|---|---|---|---|
| - | Mood | Select | light:Day,dark:Night,-,red:Strawberry,green:Apple,blue:Sky | - | - |
Submit button
The field type submit generates a button for the form. The button is usually in the end of the form and should therefore be last in the fields list in admin.
Almost all front-end frameworks has a button class which can be added with class="btn" as a attribute specification.
| Required | Name | Type | Value | Attributes | Match |
|---|---|---|---|---|---|
| - | Submit | Submit | - | class=“btn” | - |
<button type="submit" name="submit" class="btn">Submit</button>
Note that if a submit button is set to required it also needs to have a value otherwise the form-posting will not be accepted.
Tel or Phone
The tel field is used for phone number inputs and is added with a single field of the type tel, a pattern attribute can be setup for checking the phone number client side.
| Required | Name | Type | Value | Attributes | Match |
|---|---|---|---|---|---|
| - | Phone | Tel | - | placeholder=“123-4567-8901” | - |
<label for="Phone">Phone</label>
<input type="tel" name="Phone" placeholder="123-4567-8901">
If the Phone number needs to follow a specific pattern add this in the attributes field, for example
pattern="[0-9\+\-\(\)\s]+"will cover most international numbers. More on HTML patterns at mdn.
Text
text, here with the label Firstname.The text field is one of the most used form fields and allows for entries such as names and address rows etc. The text-field can have attributes such as: minlength, maxlength, placeholder
| Required | Name | Type | Value | Attributes | Match |
|---|---|---|---|---|---|
| Yes | Firstname | Text | - | minlength="4" maxlength="8" |
- |
<label for="Name">Name</label>
<input type="text" name="Name" minlength="4" maxlength="8">
Textarea
textarea, for submitting a Message.Typically, a textarea is used in a contact form for a message.
In admin a textarea is created by adding a form field with the type set to textarea, the name will be used in the label. A message field in a contact form is quite commonly set to required. Specifying the number of rows in an attribute is a good idea, as the default number is only two.
| Required | Name | Type | Value | Attributes | Match |
|---|---|---|---|---|---|
| Yes | Message | Textarea | - | rows="6" |
- |
<label for="Message">Message</label>
<textarea name="Message" rows="6" required=""></textarea>
Url
For link insertions the url field type is used.
The url-input field is the only field that allows link-insertions but also requires the input to contain https://. Adding https:// as an value makes it easier for the user to add in the website url.
| Required | Name | Type | Value | Attributes | Match |
|---|---|---|---|---|---|
| - | Website | Url | - | value=“https://” | - |
<label for="Website">Website</label>
<input type="url" name="Website" value="https://">
Translating form content
The forms built in the system can be translated under Translations.

Languages/Translations
Adding form to the website
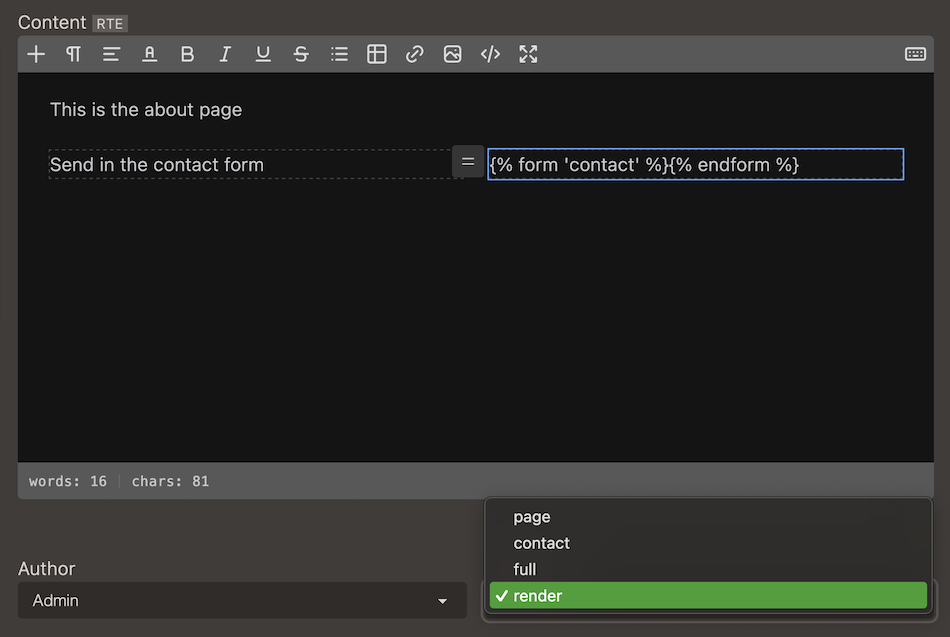
- Add the form tags
{% form 'contact' %}{% endform %}on a page in the editor (Rich Text Editor or Markup editor). - Use the
rendertemplate for the page.
The content for a page is not automatically rendered, but if including liquid filter
| renderto the html output, liquid syntax will be processed.
<section>
    <h1>{{ meta.h1 }}</h1>
    <div>
        {{ page.html | render }}
    </div>
</section>
Creating a contact page
Steps in the video:
- On a page adding a 2-column layout in the rich text editor (RTE).
- Adding a heading and text to the left column.
- Navigate to
Formsand open the editor for the form. - Adding
Name,Email, andMessagefield as well as a submit button. - Going back to the Contact page view in admin.
- Adding the form tags,
{% form 'contact' %}{% endform %}, with the form handle. - Choosing the
renderpage template. - Previewing the form on the website.
- Changing color scheme in theme settings.
Within the EU an informal note needs to be added to the form. This should state that personal information will be collected and the privacy policy is usually referenced. If the form is used for sign-ups to marketing activities such as newsletters or SMS also a checkbox needs to be included.
Generated form HTML
When {% form '<handle>' %} and {% endfrom %} tags have no content in between, markup for the form is generated from the setup in admin.
{% form '<handle>' %}{% endform %}
The success and error messages can be defined in the form tags. These will appear in Translations for altering the messages in different languages.
{% form 'contact' class:'card-body' success:'Thank you for contacting us!' error:'Form contains errors!'%}{% endform %}
Example code
Generated code for a typical contact form:
<form method="POST" name="contact" id="contact-form" action="/forms/contact">
	<input type="hidden" name="returnUrl" value="/#contact-form">
	<label for="name">Name</label>
	<input type="text" name="name" required="">
	<label for="email">Email</label>
	<input type="email" name="email" required="">
	<label for="phone">Phone</label>
	<input type="tel" name="phone" required="">
	<label for="subject">Subject</label>
	<input type="text" name="subject" required="">
	<label for="message">Message</label>
	<textarea name="message" required="" rows=""></textarea>
	<input type="submit" name="submit" required="" value="Send">
</form>
Custom HTML code in template
If including HTML inside of the {% form %} tag, this code will be used instead of the generated code.
Code for a typical contact form:
{% form 'contact' %}
 <h3>Say hallo!</h3>
   {% if form.errors %}
    <div class="alert alert-error">
     <span>Sorry, looks like something went wrong, please try again.</span>
    </div>
   {% endif %}
   {% if form.success %}
    <div class="alert alert-success">
     <span>Thank you for the message, we will contact you shortly!</span>
    </div>
   {% else %}
    <label class="input {% if form.errors contains 'name' %} input-error{% endif %}">
     <input type="text" name="name" placeholder="Name" required/>
    </label>
    <label class="input {% if form.errors contains 'email' %} input-error{% endif %}">
     <input type="email" name="email" placeholder="Email" required />
    </label>
   <textarea placeholder="Message" name="message"  class="textarea {% if form.errors contains 'message' %} textarea-error{% endif %}" required ></textarea>
   <button type="submit" class="btn btn-primary">Send</button>
  {% endif %}
 </div>
{% endform %}
With
{{ form | print_r }}it is possible to view the form object.