Cradle CMS and eCommerce comes with forms functionality built in. There are no limitations on the amount of forms and they can be used without the use of JavaScript.
For more information about the setup of forms check out the Form builder guide
Format
{% form '<handle>' attributes %}
<html content>
{% endform %}
| Description | Example | |
|---|---|---|
<handle> |
The handle of the form , if setting up a form in the builder this is the name of the form. Otherwise it can be one of the premade forms in the system | contact |
attributes |
The attributes are inserted as ids or classes on the generate form. | class:'w-full border rounded p-4' |
<html content> |
The area to include HTML for the form, if not using the built-in format | See below |
{% form %} tag
When setting up a form in admin, the form will get a handle, this handle needs to be added in a {% form '<handle>' %} liquid tag or <form name="<handle>" action="/forms/contact" method="POST"></form> HTML-tag. Note in the follwoing example that you can add id and class in the {% form %} tag.
if no class is defined on the form
class="cradle"is added to the<form>element.
{% form 'contact' id:'my-id' class:'special form' %}{% endform %}
will generate the following
<form class="special form" name="contact" action="/forms/contact" method="POST" id="my-id">
	<form content>
</form>
Since you can have several forms in a template the form value, in this case contact is matched to it’s handle or name.
<form name="contact" id="contact-form" action="/forms/contact" method="POST">
</form>
Form success and error messages
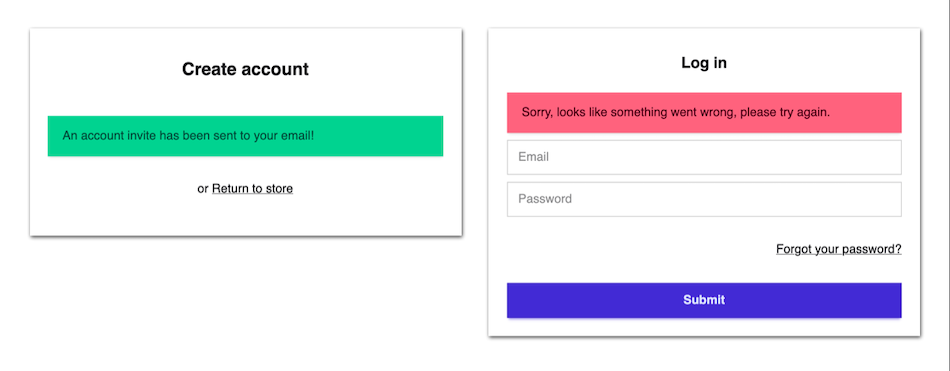
The form submitted is either a success or contains errors, these states can be communicated to the form submitter in the theme template, this can be done in a few different ways.
Form object
The form error object will contain an array of the fields that contained the error which can be used to specify and further notify the form submitter, for example by adding a class {% if form.errors contains 'name' %} input-error{% endif %} to the input field.
{% if form.errors %}
 <div class="alert alert-error">
  <span>Sorry, looks like something went wrong, please try again.</span>
 </div>
{% endif %}
Autogenerated forms
Form error and success message is appended before the submit button if they are specified in the Liquid form tag. All form fields and messages are translated in Language > Translations (found under form context).
{% form 'contact' class:'card-body' success:'Thank you for contacting us!' error:'Form contains errors!'%}
{% endform %}
{% form %} tag
Form redirects
| Attributes | Description | Attribute |
|---|---|---|
| On success | Defines redirect after success | onSuccess:'/cart' |
| On return | Defines where to redirect on any form return | return:'/' |
It is possible to include the request object for the return direction {% form 'contact' return:request.referer %}{% endform %}.
Example of HTML content
<div class="form-control">
  <label class="{% if form.errors contains 'email' %} input-error{% endif %} flex items-center gap-2">
    <input type="email" name="email" class="grow  input input-bordered" value="{% if customer %}{{ customer.email }}{% endif %}" placeholder="Email" autocorrect="off" autocapitalize="off" required />
   </label>
</div>
<button type="submit" class="btn btn-primary">Send</button>
eCommerce
Customer account forms
{% form 'customer_register' %}{% form 'activate_customer_password' %}{% form 'customer_login' %}{% form 'customer_password_reset' %}
Checkout forms
{% form 'cart_update' %}{% form 'cart' %}{% form 'checkout' %}{% form 'order_withdrawal' %}
cart_update Add product to cart
cart_update form can be used for adding products to cart.
{% form 'cart_update' class:'' onSuccess:'/cart' %}
	<input type="hidden" name="product" value="{{product.id}}">
	<input type="hidden" name="quantity" value="1">
	<input type="hidden" name="variant" value="{{product.variants[0].id}}">
	<button
		name="submit"
		class="btn {% if product.quantity <= 0 %} btn-disabled{% endif %}"
		{% if product.quantity <= 0 %}disabled{% endif %}
	>
			{% unless  product.quantity <= 0 %}
				 {{ 'Add to cart' | t }}
			{% else %}
				 {{ 'Out of stock' | t }}
			{% endunless %}
		</button>
{% endform %}
/cart
Form entries
Form submissions are validated server-side before saved.
Input types
text, textarea, number, email, tel, url, color, date, datetime, month, week, time, select, range, hidden, reset and submit.
Text
The input attributes are used as a client-side validation.
Input Example
| Required | Name | Type | Value | Attributes | Match |
|---|---|---|---|---|---|
| Yes | Name | Text | - | minlength=“4” maxlength=“8” | - |
<label for="Name">Name</label>
<input type="text" name="Name" minlength="4" maxlength="8" required="">
Textarea
Typically a textarea is used in a contact form for a message, and could be set to required. Specifying the number of rows as an attribute is a good idea as the default number is only two.
Input
| Required | Name | Type | Value | Attributes | Match |
|---|---|---|---|---|---|
| Yes | Message | Textarea | - | rows="6" |
- |
<label for="Message">Message</label>
<textarea name="Message" rows="6" required=""></textarea>
Number
Number input can be used to collect a number and by adding attributes it is possible to get stepped values between a minimum and maximum amount.
Input
| Required | Name | Type | Value | Attributes | Match |
|---|---|---|---|---|---|
| - | Amount | Number | - | min=“100” max=“900” step=“10” | - |
<label for="Amount">Amount</label>
<input type="number" name="Amount" min="100" max="900" step="10" >
A required email input field specification
Input
| Required | Name | Type | Value | Attributes | Match |
|---|---|---|---|---|---|
| Yes | - | - | - |
<label for="Email">Email</label>
<input type="email" name="Email" required="">
Phone
Input
| Required | Name | Type | Value | Attributes | Match |
|---|---|---|---|---|---|
| - | Phone | Tel | - | - | - |
<label for="Phone">Phone</label>
<input type="tel" name="Phone">
Url
As form entries are validated server-side for malicious use URLs/links are only allowed in form fields with type
url.
Input
| Required | Name | Type | Value | Attributes | Match |
|---|---|---|---|---|---|
| - | Website | Url | - | - | - |
<label for="Website">Website</label>
<input type="url" name="Website" >
Colorpicker
Input
| Required | Name | Type | Value | Attributes | Match |
|---|---|---|---|---|---|
| - | Colorpicker | Color | - | - | - |
<label for="Colorpicker">Colorpicker</label>
<input type="color" name="Colorpicker">
Date
Input
| Required | Name | Type | Value | Attributes | Match |
|---|---|---|---|---|---|
| - | Date | Date | - | - | - |
<label for="Date">Date</label>
<input type="date" name="Date">
Datetime
Input
| Required | Name | Type | Value | Attributes | Match |
|---|---|---|---|---|---|
| - | Date | Datetime | - | - | - |
<label for="Date">Date</label>
<input type="datetime-local" name="Date">
Month
Input
| Required | Name | Type | Value | Attributes | Match |
|---|---|---|---|---|---|
| - | Date | Month | - | - | - |
<label for="Date">Date</label>
<input type="month" name="Date">
Week
Input
| Required | Name | Type | Value | Attributes | Match |
|---|---|---|---|---|---|
| - | Date | Week | - | - | - |
<label for="Date">Date</label>
<input type="week" name="Date">
Time
Input
| Required | Name | Type | Value | Attributes | Match |
|---|---|---|---|---|---|
| - | Time | Time | - | - | - |
<label for="Time">Time</label>
<input type="time" name="Time">
Select
Input
| Required | Name | Type | Value | Attributes | Match |
|---|---|---|---|---|---|
| - | Select | Select | Cat, Dog, Rabbit | - | - |
<label for="Select">Select</label>
<select name="Select">
  <option value="Cat">Cat</option>
  <option value="Dog">Dog</option>
  <option value="Rabbit">Rabbit</option>
</select>
Range
Input
| Required | Name | Type | Value | Attributes | Match |
|---|---|---|---|---|---|
| - | Range | Range | - | min=“0” max=“5” | - |
<label for="Range">Range</label>
<input type="range" name="Range" min="0" max="5">
Hidden
Input
| Required | Name | Type | Value | Attributes | Match |
|---|---|---|---|---|---|
| - | Hidden | Hidden | - | - | - |
<input type="hidden" name="Hidden" value="">
Reset
Input
| Required | Name | Type | Value | Attributes | Match |
|---|---|---|---|---|---|
| - | Reset | Reset | Reset | - | - |
<input type="reset" name="Reset" value="Reset">
Submit
The tyoe Submit generates a button.
| Required | Name | Type | Value | Attributes | Match |
|---|---|---|---|---|---|
| - | Submit | Submit | Submit | class=“btn” | - |
<button type="submit" name="submit" class="btn">Submit</button>